Because a great audition does not depend on your bank account.
Why Your Self-Tape Setup Matters
In today’s casting world, self-tapes are the norm—not the exception. Your setup is part of your first impression. A clean, professional-looking tape helps casting focus on your performance, not your lighting or sound issues.
But don’t worry—you don’t need Hollywood gear to deliver a standout audition. Here’s how to build a self-tape setup that fits your budget, from broke-but-determined to pro-level polish.
Budget: $0–$50 — The DIY Hustler Setup
You’re just starting out or in between paychecks. No problem. Here’s how to pull it together for almost nothing:
What You’ll Need:
- Smartphone with HD camera (Most phones today shoot in 1080p or higher)
- Natural light (Film during the day facing a window)
- Neutral wall or sheet (Avoid patterns; light gray or blue works best)
- Stack of books or tripod substitute (To prop your phone)
- Quiet room (Use towels to dampen echo if needed)
Pro Tips:
- Record horizontal, not vertical.
- Lock focus and exposure on your phone camera.
- Use airplane mode while recording to avoid interruptions.
Cost-effective and clean when done right. Your performance still shines.
Budget: $50–$200 — The Solid Starter Kit
Ready to upgrade just a little? Here’s what you can invest in:
Suggested Add-Ons:
- Ring light or softbox ($30–$80)
- Adjustable tripod with phone mount ($20–$40)
- Clip-on lavalier mic or USB mic for clearer sound ($25–$50)
- Pop-up backdrop or wrinkle-resistant sheet ($20–$30)
Pro Tips:
- Place your light at eye level, slightly off-center to avoid flat lighting.
- If using a mic, monitor for rustling or clothes noise.
- Use a free editing app like iMovie, CapCut, or Splice to trim and label.
This setup gives you clean, reliable quality without the studio price tag.
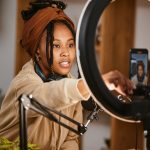
Budget: $200+ — The Actor-as-Content-Creator Setup
If you’re booking consistently or creating content regularly, it may be time to level up.
Go-To Gear:
- DSLR or mirrorless camera with flip screen (Canon M50, Sony ZV-E10)
- 2-point lighting kit with softboxes or LED panels
- Professional tripod with fluid head
- Shotgun mic or lavalier system (Rode, Deity, Sennheiser)
- Backdrop stand with multiple color options
Pro Tips:
- Use manual settings on your camera to control exposure.
- Record audio externally if possible—then sync in post for best clarity.
- Save presets in your editing software for fast turnaround.
You’ll be ready for not just auditions, but branded content, interviews, and reels too.
Bonus: No Matter Your Budget, Do This
- Frame from mid-chest up (Unless instructed otherwise)
- Slate with your full name, height, and location clearly
- Follow instructions exactly—casting directors notice
- Double-check your file name and format before submitting
🎙️ Show Up Like It’s the Role of a Lifetime—Because It Might Be
Your performance is what books the job. But a polished, professional self-tape helps get your foot in the door. Whether you’re taping with sunlight and a smartphone or a camera and kit, the goal is the same: clear, honest storytelling.